A repository for my team to learn and understand GitHub.
GitHub may seem like some entirely new technology where every project is worked upon, but it's very easy to get used to. GitHub is the best way for a team to work on a project as everybody can work on the same code without causing any harm to the main code.
Below steps are meant to be a way for anybody novice at GitHub to understand the basics of cloning and pushing while also understanding branching and pull request model which are practiced in the current industry. I hope this repository can act as a guide for you.
If you wish to learn GitHub through this repository, create an issue and I will add you as collaborator, providing you access to create branches in this repository
Visit GitHub's documentation to install Git Bash and set-up everything on your local system.
This is important to be able to work on this repository on your local system. Run the following on Git Bash or Command Line Interface of your system.
git clone https://github.com/vish-rt/teaching-github.git
You can open this project within VSCode or any other preferred IDE. While working you may notice such changes within your IDE:
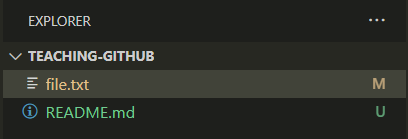
Mstands for Modified Files (i.e: the files which already exist on the repository but are modified on your local)Ustands for Untracked Files (i.e: the files which do not exist on the repository and were crreated by you on your local)
At any given time, you can check the status of your modifications on the local:
git status
- Staging Area in Git is is the middle ground between what you have done to your files and what was last committed in the repository.
- Before reflecting your changes on GitHub, all files are needed to be added to this staging area.
- To add files to staging area, use the following command:
git add file.txt
- This adds file.txt to the staging area. If you want to add all files, use
git add .
- GitHub is a version control tool. To track all past versions, GitHub uses
commitsmade by contributors to show changes made to the files. - To reflect your local changes on GitHub, they need to be committed first with the following command:
git commit -m "<your commit message>"
- You must ensure that
<your commit message>is a valid explanation of the changes you have made to the files.
Finally, once all of the above are done, push your changes to GitHub:
git push
Many organizations like TCET - Open Source, follow the Pull Request (PR) Model to add their contributions on GitHub. It is necessary to understand how they work in order to contribute to any repository.
- For multiple contributors working on various parts or features of a project, GitHub makes use of
branchesin order to let you work on your code and push it without interfering the code being worked on by other contributors. - To create your branch, use the following syntax:
git checkout -b <your branch name>
-
This enables you to create a branch and switch on it. One must ensure that the branch names are not random and reflect the feature it is used to work on.
-
To list all branches of a repository use the following command:
git branch -a
- For switching between branches, use the
git checkout <branch name>command, replacing it with the actual branch name. - Before committing any changes you need to ensure that you are pushing to the correct branch using
git branchcommand, otherwise you may make a fellow contributor very unhappy. - You can also push to a specific
<branch name>using:
git push origin <branch name>
- Usually in organizations, the
mainbranch is locked by the repository admin to ensure that no outside contributor directly edits the main source code of the project. - Upon pushing to your branch, you would be able to see updates on GitHub:

- You can click on
Compare and Pull Request(or alternatively, visit your branch and click onContribute) to create a Pull Request.
By following the above step, you will be able to edit the PR on GitHub's editor. As a good developer practice, you should elaboratively describe what changes you have made to the code and highlight them in the description.
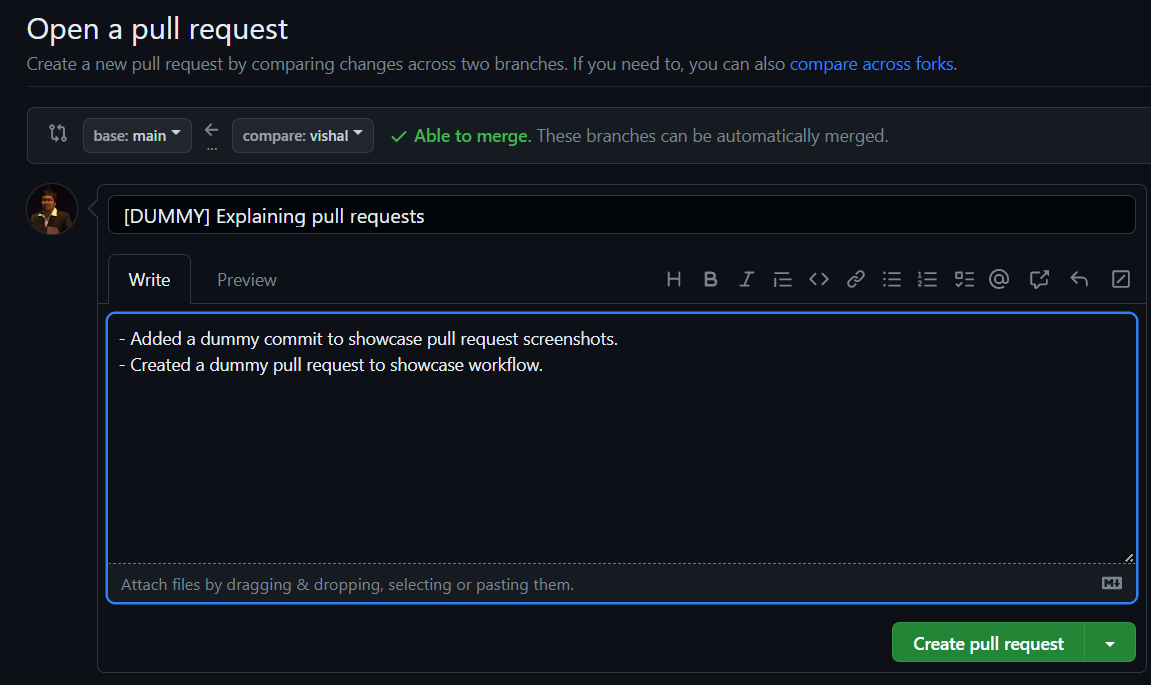
- Upon submitting the pull request, the administrator is notified of your changes and can approve, reject or add suggestions to your merge.
- You can also notify repository maintainers and engage conversations with them on the pull request. An example of such conversation can be observed here:

Once a maintainer approves your changes, then finally your pull request will be merged to the main branch.
-
Now that you have multiple branches and several versions of code scattered around GitHub and your local storage. You need to make sure that you always have the updated code before pushing to GitHub to avoid merge conflicts.
-
Before starting to work on your code, you must ensure that your branch is up-to-date with the
mainbranch.
-
If your branch is n commits behind main, you need to open a pull request to merge
mainbranch content to your branch. -
To bring these changes in your local, use the following command:
git pull
It is a good developer practice to always pull updated code before pushing your modified code to the repository.
Take everything one step at a time. Everything here may feel overwhelming as there are too many things to be aware of, but following this guide will help you grasp the concepts of Git and GitHub, from basic cloning to creating your first pull request.
If you're stuck or confused or have any suggestions, reach out to me by creating an issue in this repository or via Discord. I'll be happy to help!